Storybook Moments ~Treat BOOK Box
Storybook Moments ~ Book Treat Box
In MY opinion 'one cannot have enough Storybook Moments projects'.
Pretty sure it's been my most favorite Designer Series Paper (DSP) that Stampin' Up! has ever released.
The sweet prints, soft colors, pre-printed die cuts.... OH MY CUTENESS!!!
The entire Storybook Moments Suite has been highly popular and rightfully so!!
With the name 'StoryBOOK Moments, I knew at some point I needed to pair this paper with the Stampin' Up! Book Treat Boxes. And with Easter quickly approaching, I felt now would be the perfect opportunity.
🐰🌸🐣🌾🐤🌼🐰🌸🐣🌾🐤🌼🐰🌸🐣🌾🐤🌼
Last week I shared this same project (though different in pattern) over on my Facebook page and YOU all loved it. So much so, that many of you reached out asking for instructions.
Well, today is the day. Here you go......
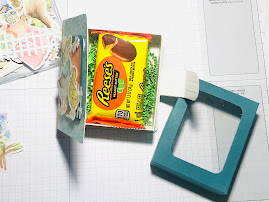
Surprise!!! I've added a little framed cover that's fits perfectly over the inside.
Not only does this help hold your treats securely inside, but it also adds a finished appearance to the
outside of the book itself when closed. Scroll down a bit to be amazed. Lol!!!
🌷🐇📙🐓📘🐥📗🐣🌾🐰🌹📚🐥🌷🐇📙🐓📘🐥📗🐣🌾🐰🌹📚🐥
Minimal supplies needed:
~ Storybook Moments DSP #164662 (includes 1 sheet of die-cuts not shown in photo below)
~ Coordinating cardstock
~ Nested Essentials Dies (or something similar) #161597
~ Book Treat Boxes #164048
~ Clear Window Sheet #142314
Alrighty, let's get started.....
I began by laying the Book Treat box flat on the back side of the DSP and traced around it.
Cut along the traced line. Go ahead and cut the 'tab' off. I found the book and tab piece lines up easier when adhered separated. Liquid glue allows for a little wiggle room to adjust the paper pieces exactly where you want them. For a finished look, you may trim the corners to follow the roundness of the Book Box.
1. Cut your coordinating cardstock to 4 7/8" x 5 5/8"
2. Score at 1" on all 4 sides. Burnish all score lines and trim according to photo below.
3. Die cut the center of this piece, using two dies that will not only cut a window, but will also give you a frame piece to use in a later step.
4. Using the smaller of the two dies, cut the center from this Calypso Coral frame piece.
*This frame piece is from the 'cut apart' sheet in the DSP pack.
5. Assemble your 'lid' as shown below, being sure to adhere the tabs on the INSIDE.
6. Cut a 2 3/4" x 3 1/2" piece of Window Sheet and adhere inside the lid, covering your window.
7. Cut a 1 1/2' x 4" piece of coordinating DSP and adhere to create the book binding.
8. Adhere your frame and the insert piece to the front of your book. Pay special attention to NOT put adhesive where the tab lines up. Once the frame panel piece is adhered, you should have a little 'pocket' that will house the tab and keep your book closed yet, easily opened for your recipient.
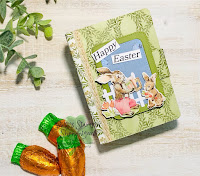
***Now the fun part. Create and adhere the scene for your book front.
9. Attach to your frame panel. Adhere half of the fence piece, a couple of ducks, some greenery & flower pieces and butterflies. ALL of these pieces are from the die-cut sheet in the DSP pack.
SURPRISE!!!!!!
Finally, add a small amount of easter grass and treat of choice. Place your assembled lid over the inside book box
Have you fallen in love yet?
These Book Treat Boxes can be filled for any occasion, simply be changing your DSP and treats accordingly.
In case you missed it.....
Here's a look at my original Treat BOOK Box that I shared over
on my Facebook page last week.
----------------------------------------------------------------------------
To shop for all of the products I've used here or any of your Stampin' Up favorites
simply click the shopping cart below...
------------------------------------------------------------------------------
NEW Mixed Media Florals Class Kit To-Go offering ....
I love this class so much and think YOU"LL love it too!!!!!
This class will allow you to make these 15 (yes FIFTEEN) multi-layered, NO stamping, simple cards and still have some supplies left over to make a few more.
Pre-cut, and packaged for easy assembly, at your leisure, when the time is right.
I've outlined all the details within the link below.
***Deadline to order is March 29, 2025
Thank you for stopping by. Wishing you a craft-tastic day, filled with all things 'happy'!
<💚Be the reason behind someone's smile💚>
Patti Davidson
Durant, Oklahoma


.jpg)


Comments
Post a Comment